|
|
Post by mongoose on Sept 13, 2011 14:28:37 GMT -5
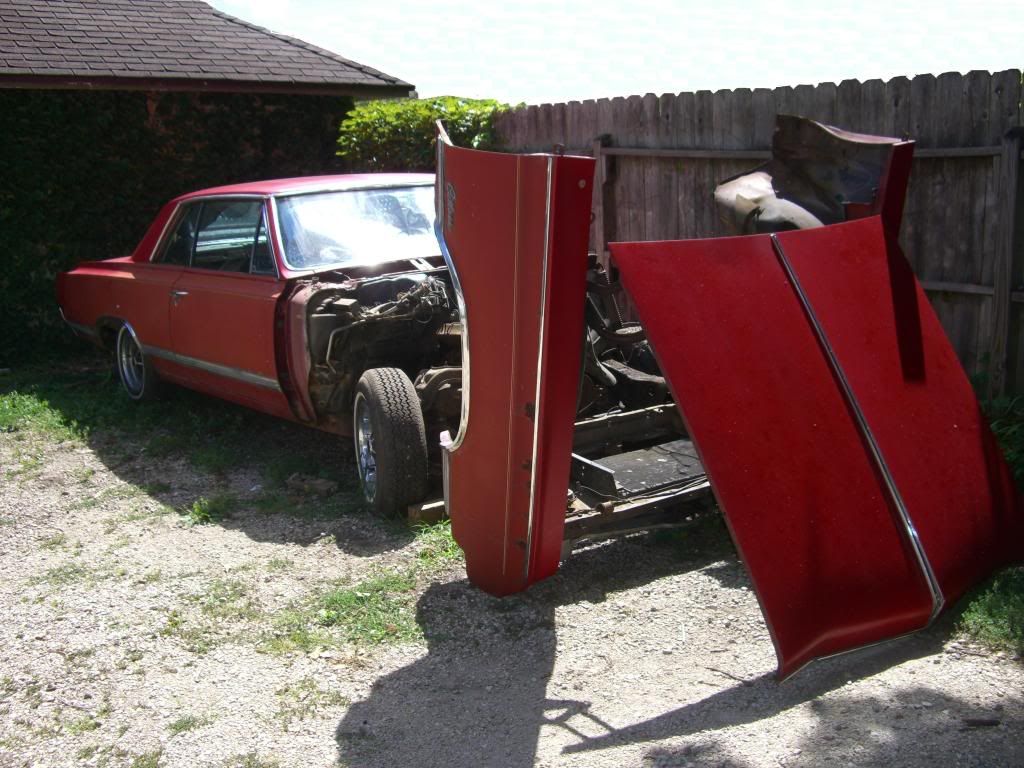
I've got a small oil leak between the intake and rear end-rail on the drivers side... where the head, intake and block all come together. Has anyone had any success in "patching" something like that with a method other than pulling the intake and starting over? When I put it together, I didn't use those rubber end-rail gaskets, but instead applied about a 1/4" bead of silicone all along the rail. Obviously that worked well...  |
|
Deleted
Deleted Member
Posts: 0
|
Post by Deleted on Sept 13, 2011 14:56:31 GMT -5
The RTV is the way I prefer, but obviously you were a little sparse in one area. 1/4" is a little light.
The biggest problem I see is the location. The only advise I can give you is to clean the entire area with mild detergent, blow dry with compressed air (40-50 psi) don`t be blowin 150lbs of shop air at it. Make sure it`s dry, even if it means taking a hair dryer after it and more air, leave it sit overnight and blow it off again. What I`m trying to tell you is it has to be DRY. Now lay rags and stuff around the area, especially under the leak, spray some carb cleaner in the crack area (don`t have to saturate it, just enough to get any film out of the crack, after just a few seconds blow dry with low air pressure, take your time so all the cleaner evaporates, use RTV black on your finger and press the RTV in to the crack area, use your finger like a squeegee and scrape and press it in there. You can mask the area off with tape to minimize the mess, cuz this shit gets everywhere.
Best I can help, key words, clean & dry. And DON`T START FOR 24 HRS
I can`t see your engine in the pic (the chrome blinds me), but it`s vented well?
|
|
|
|
Post by slowolds on Sept 13, 2011 15:27:40 GMT -5
Postcar is right on the money. I just did this before the Byron meet.
I was getting pooling on the block around the distributor but I was not sure exactly where it was coming from.
I pulled the dist. , got the coil and throttle linkage well out of the way and started cleaning with brake clean and rags.
Just when you think its clean. Get a new rag and clean it again.
Make sure it is dry. I put a disposable glove on and put a big glob of Ultra gray on two fingers and followed the block making sure i was pressing it into the block well. Then went back over with a little more material on my fingers to the head/manifold side pushing it into the other bead. It did not leak racing.
|
|
|
|
Post by mongoose on Sept 13, 2011 16:25:57 GMT -5
I'll give that approach a try guys. THANKS! Sorry about the chrome postcar... remember to wear sunglasses when you view my pix. ;D I have a breather in each valve cover... and a vented oil filler cap. Shield your eyes... 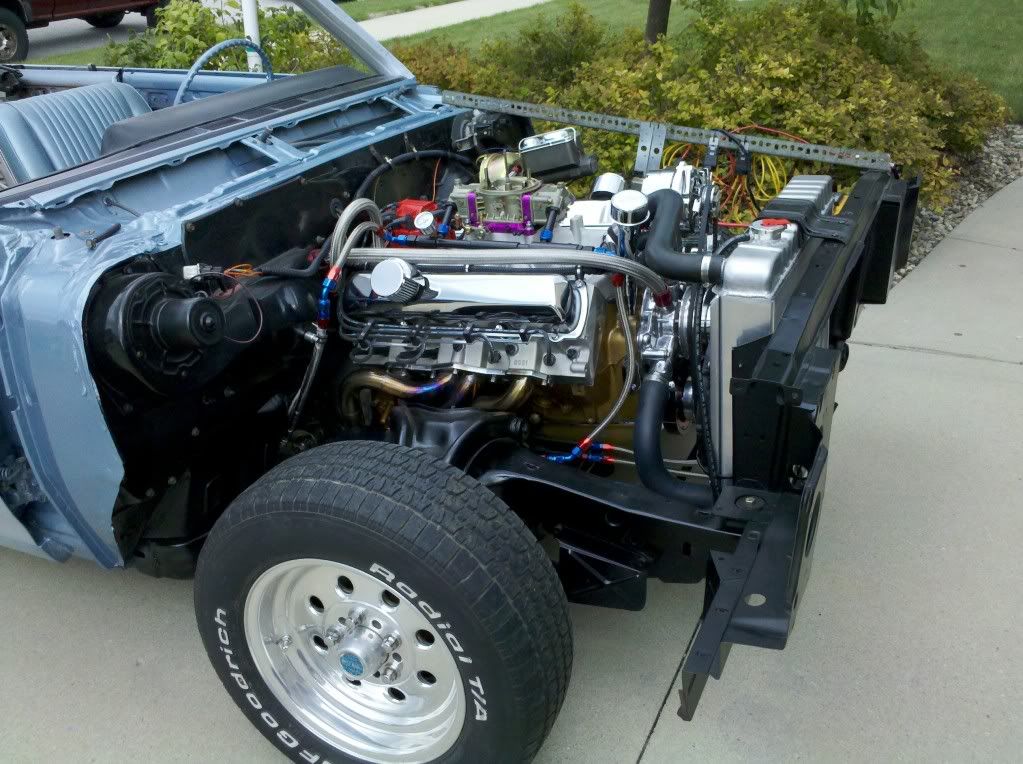 |
|
Deleted
Deleted Member
Posts: 0
|
Post by Deleted on Sept 13, 2011 16:56:15 GMT -5
|
|
Deleted
Deleted Member
Posts: 0
|
Post by Deleted on Sept 13, 2011 17:07:52 GMT -5
Looking at your pic above I wish I would have listened to my inner voice and used a brace like you did on your rad. support. Long story, use your imagination, think the worse, I`m ashamed of myself !!
|
|
|
|
Post by chadman on Sept 14, 2011 7:15:27 GMT -5
When you originally installed the manifold what type of RTV did you use? I have by far had the best luck with Permatex Ultra Grey myself. It sets up more solid than the others I have used.
|
|
|
|
Post by mongoose on Sept 14, 2011 19:24:09 GMT -5
I used Permatex Ultra Grey.
I'm going to put some UV dye in the oil and try to pin point the exact location of the leak. Is it possible that the oil is seeping out between the head and that very narrow strip at the top of head mating surface that runs along where the head's oil drain back passage empties to the valley of the block? I used Cometic MLS head gaskets.
|
|
|
|
Post by mongoose on Sept 15, 2011 18:01:26 GMT -5
Ok... added some UV dye to the oil, ran the motor for about 15 minutes to get the dye to finally make its way to the leak.
It's just a lousy job of putting a good enough bead of RTV on the end rail. Damn.... motor was sitting on an engine stand when I put it together. I don't like being a dumb ass. The leak is in the very corner, or really about 1/4" away from it, between the RTV and the intake.
So I'll try the clean, dry, clean again, dry again, press RTV into the spot, and let that dry 24 hours plus, and see if that gets the job done. If not, it's not the end of the world with no front-end sheet metal on the car. I'll just have to get a new set of intake gaskets.
I almost wonder if I should just suck it up, order a new set of Felpro intake gaskets, pull the intake, and try to seal it up again?
|
|
|
|
Post by mongoose on Sept 23, 2011 5:23:45 GMT -5
Pulled the intake last night. I just decided it made more sense to pull it and put fresh gaskets and RTV on it while the front end is off of it... making access much easier. So now I've got some work ahead of me scraping RTV and gasket material off the heads and intake. Then I'll clean all the surfaces really good, and let them dry before I start over. Looking at the RTV, it appears that I had a seal by looking at it... but just barely. So obviously the oil was able to follow the various "fissures" in the RTV and find an escape route. Looks like a used a bit too much RTV around the intake ports, and not quite enough on the end rails. I'll try to do better this time. |
|
|
|
Post by bubbasz1 on Sept 23, 2011 6:50:57 GMT -5
Nothing wrong with a little self tutoring, some of us have learned our whole life like that. Learn the hard way and you'll never forget.
|
|
|
|
Post by mongoose on Sept 24, 2011 10:19:11 GMT -5
Ok... scraped and cleaned w/ Brake clean.
Before I put this thing back together, is there anyone that would recommend that I use the rubber end rail seals that came with the Felpo intake gasket set, instead of only using Ultra Grey RTV?
I don't want to do this again because of a leak.
|
|
Deleted
Deleted Member
Posts: 0
|
Post by Deleted on Sept 24, 2011 12:09:41 GMT -5
Ok... scraped and cleaned w/ Brake clean. Before I put this thing back together, is there anyone that would recommend that I use the rubber end rail seals that came with the Felpo intake gasket set, instead of only using Ultra Grey RTV? I don't want to do this again because of a leak. No one I know would without doing a dry assembly first to determine the gap. (which you should do regardless) put shim stock, or clean your old intake material and lay it on the intake ports. If you used a turkey tray just cut off the tray from the intake sides, then lay your manifold down, wiggle around a little to seat it and see what you have for clearance between the block and manifold. My guess the neoprene is usually too thick, if there is enough clearance to use the seal, put a VERY fine film on the block (paying close attention to the corners) install the seal, then a VERY thin film on top of the seal ( again paying attention to the corners) put your intake on and torque before the sealant starts to set up. One problem is intakes are sometimes installed not cleaned properly, and the rtv is left to cure too long. another trick is to take a center punch and punch along the rail of the block and intake to give a little grip surface for the rtv. With your aftermarket heads and intake, it`s hard to tell what gap your going to find. I put my shades on and took a good look at your engine, you have to get that front end down at least a few degrees, like 3 |
|
|
|
Post by mongoose on Sept 29, 2011 5:44:51 GMT -5
I'm going to step out on a limb here (also looking for wood to knock on) and declare success.
Checked the installed endrail to intake gap as posty suggested... 0.180". Rubber end rail gaskets were 0.172" thick.... thought about it for a moment.... nah!
Had a caulking gun full of Ultra Grey RTV, everything scraped and wiped down with brake clean from the day before, and proceeded to re-install the fresh Felpro gaskets (http://www.summitracing.com/parts/FEL-1356/), not using quite so much RTV to minimize the squeeze-out into the intake ports, and applied a healthy 0.250" bead along the end rails, adding an extra dollop in the corners (14 year old step-son asked what a dollop was the other day). When I set the intake in place, got a nice little squeeze out on the end rails... nothing squeezed out... just got a nice bulge (the RTV... not me). Hand tightened the bolts at first, and let the RTV set up for an hour. Then finished torquing and installing everything else. Let it set for a bit more than 24 hours, and put the coolant back into the radiator.
I've run it a few times now, and don't find any leaks. Keeping my fingers crossed.
BTW... those of you with a Edelbrock Torker intake, I noticed that the Holley brand (and Mr. Gasket) carb base gasket (for a square-bore Holley) are actually a bit too narrow, and appear to allow a slight vacuum leak on the passenger side of the carb. I was looking over the old gasket and noticed the imprint from the intake showed that where the flange curves out for a spread-bore style carb the gasket only reached the edge, but did not sit on the flange. I compared the old gasket to a few new ones at the store, same size. I ended up making a gasket with sheet gasket material (rubberized), but also ordered an Edelbrock branded gasket (http://www.summitracing.com/parts/FEL-1900/), and it has about 0.250" more material on each side of the gasket, to accommodate the "dual-flange" style intake design.
Could be a tolerance difference between intakes... but I'm guessing the reason Edelbrock's gasket is a bit wider is to account for that.
|
|